

My first experience with NextJS | Basic features of NextJS
I have been using React for more than 1.5 years, and I wanted to try it out NextJS. I was just blown away by the features it has out of the box.


Situation
As I began my web development journey, I found React library to be more popular with the great community of developers. That caused me to learn React library for building web apps. I have been using React library for my project for more than 1.5 years. I found many issues with this library. But the major problem I found was with SEO (Search Engine Optimization).
Some other issues are:
- Page Routing
- HMR (Hot Module Replacement) - Had to do manually
- File Bundling
- Code-Splitting - Had to do manually
We could use Vite to solve these problems, except for SEO and Code-splitting (optimization technique for single-page apps). Learn about Vite and how to setup React projects with Vite here.
While searching for solutions for my problems, I came across NextJS.
Let's go through the journey of using NextJS for the first time. 🚔🚔
What is NextJS?
NextJS is an open-source development framework built on top of Node.js enabling React based web applications functionalities such as server-side rendering and generating static websites.
Creating NextJS project using npx
npx create-next-app blog
cd blog
npm run dev

## node server started running on http://localhost:3000
Our project file structure looks something like this,
blog
├── .next/
├── node_modules/
├── pages/
│   ├── api/
│   │   └── hello.js
│   ├── _app.js
│   └── index.js
├── public/
│   ├── favicon.ico
│   └── vercel.svg
|── styles/
|   ├── globals.css
|   └── Home.module.css
├── .eslintrc.json
├── .gitignore
├── next.config.js
├── package.json
├── package-lock.json
├── README.md
In NextJS, a page is a React Component exported from a file in the pages directory.
Pages are associated with a route based on their file name. For example:
pages/index.jsis associated with the/route.pages/posts/first-post.jsis associated with the/posts/first-postroute.
Now if we go to http://localhost:3000/api/hello, it returns a JSON object.
{
  "name": "John Doe"
}
Any file inside the folder pages/api is mapped to /api/* and will be treated as an API endpoint instead of a page. They are server-side only bundles and won't increase our client-side bundle size.
Client-side navigation
import Link from 'next/link'

export default function FirstPost() {
  return (
    <>
      <h1>First Post</h1>
      <h2>
        <Link href="/">Back to home</Link>
      </h2>
    </>
  )
}
The Link component enables client-side navigation between two pages in the same NextJS app.
Remember using Link component from react-router-dom package? NextJS has its own Link component for navigations.
We create routes as files under pages and use the built-in Link component. No routing libraries are required.
Code splitting and prefetching
NextJS does code splitting automatically, so each page only loads what’s necessary for that page. That means when the homepage is rendered, the code for other pages is not served initially.
This ensures that the homepage loads quickly even if we have hundreds of pages.
Only loading the code for the page we request also means that pages become isolated. If a certain page throws an error, the rest of the application would still work.
Furthermore, in a production build of NextJS, whenever Link components appear in the browser’s viewport, NextJS automatically prefetches the code for the linked page in the background. By the time we click the link, the code for the destination page will already be loaded in the background, and the page transition will be near-instant!
Static assets
NextJS can serve static assets, like images, under the top-level public directory. Files inside public can be referenced from the root of the application similar to pages.
The public directory is also useful for robots.txt, Google Site Verification, and any other static assets.
Image Component and Image Optimization
next/image is an extension of the HTML <img> element, evolved for the modern web.
NextJS also has support for Image Optimization by default. This allows for resizing, optimizing, and serving images in modern formats like .webp when the browser supports it. This avoids shipping large images to devices with a smaller viewport. It also allows NextJS to automatically adopt future image formats and serve them to browsers that support those formats.
Automatic Image Optimization works with any image source. Even if the image is hosted by an external data source, like a CMS, it can still be optimized.
Instead of optimizing images at build time, NextJS optimizes images on-demand, as users request them. Unlike static site generators and static-only solutions, your build times aren't increased, whether shipping 10 images or 10 million images.
Images are lazy loaded by default. That means your page speed isn't penalized for images outside the viewport. Images load as they are scrolled into viewport.
Images are always rendered in such a way as to avoid Cumulative Layout Shift, a Core Web Vital that Google is going to use in search ranking.
Metadata
import Head from 'next/head'

export default function FirstPost() {
  return (
    <>
      <Head>
        <title>First Post</title>
      </Head>
      <h1>First Post</h1>
      <h2>
        <Link href="/">
          <a>Back to home</a>
        </Link>
      </h2>
    </>
  )
}
<Head> is a React Component that is built into NextJS. It allows us to modify the <head> of a page.
We can import the Head component from the next/head module.
CSS Styling
NextJS has built-in support for styled-jsx.
<style jsx>{`
  …
`}</style>
It also has built-in support for CSS and Sass Modules. CSS modules automatically generates unique class names. As long as we use CSS Modules, we don’t have to worry about class name collisions.
import styles from './layout.module.css'

export default function Layout({ children }) {
  return <div className={styles.container}>{children}</div>
}
Furthermore, NextJS’s code splitting feature works on CSS Modules as well. It ensures the minimal amount of CSS is loaded for each page. This results in smaller bundle sizes.
CSS Modules are extracted from the JavaScript bundles at build time and generate .css files that are loaded automatically by NextJS.
Global Styling
If we want some styling to be loaded by every page then,
- Create
globals.cssfile inside top-levelstylesfolder. - Add your CSS.
- import your
globals.cssfile inside_app.jsfile that is inside top-levelpagesfolder.
import '../styles/globals.css';

function MyApp({ Component, pageProps }) {
  return <Component {...pageProps} />;
}

export default MyApp;
- Your file structure should look something like this,
├── pages/
│   ├── api/
│   │   └── hello.js
│   ├── _app.js
│   └── index.js
|── styles/
|   ├── globals.css
We import globals.css inside _app.js because NextJS uses the App component to initialize pages.
The Component prop is the active page, so whenever we navigate between routes, Component will change to the new page.
Pre-rendering
By default, NextJS pre-renders every page. This means that NextJS generates HTML for each page in advance, instead of having it all done by client-side JavaScript. Pre-rendering can result in better performance and SEO.
Each generated HTML is associated with minimal JavaScript code necessary for that page. When a page is loaded by the browser, its JavaScript code runs and makes the page fully interactive. (This process is called hydration.)
Two Forms of Pre-rendering
NextJS has two forms of pre-rendering: Static Generation and Server-side Rendering. The difference is in when it generates the HTML for a page.
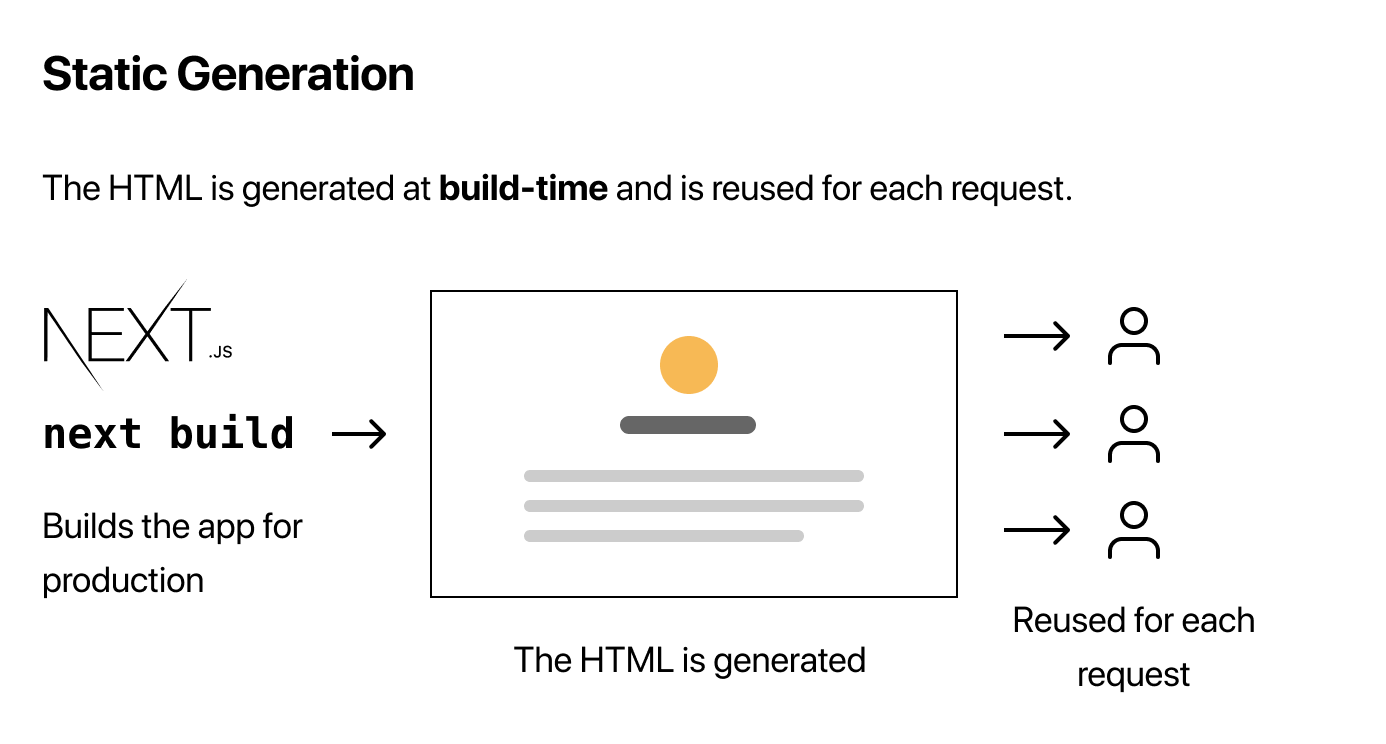
- Static Site Generation (SSG) is the pre-rendering method that generates the HTML at build time. The pre-rendered HTML is then reused on each request.
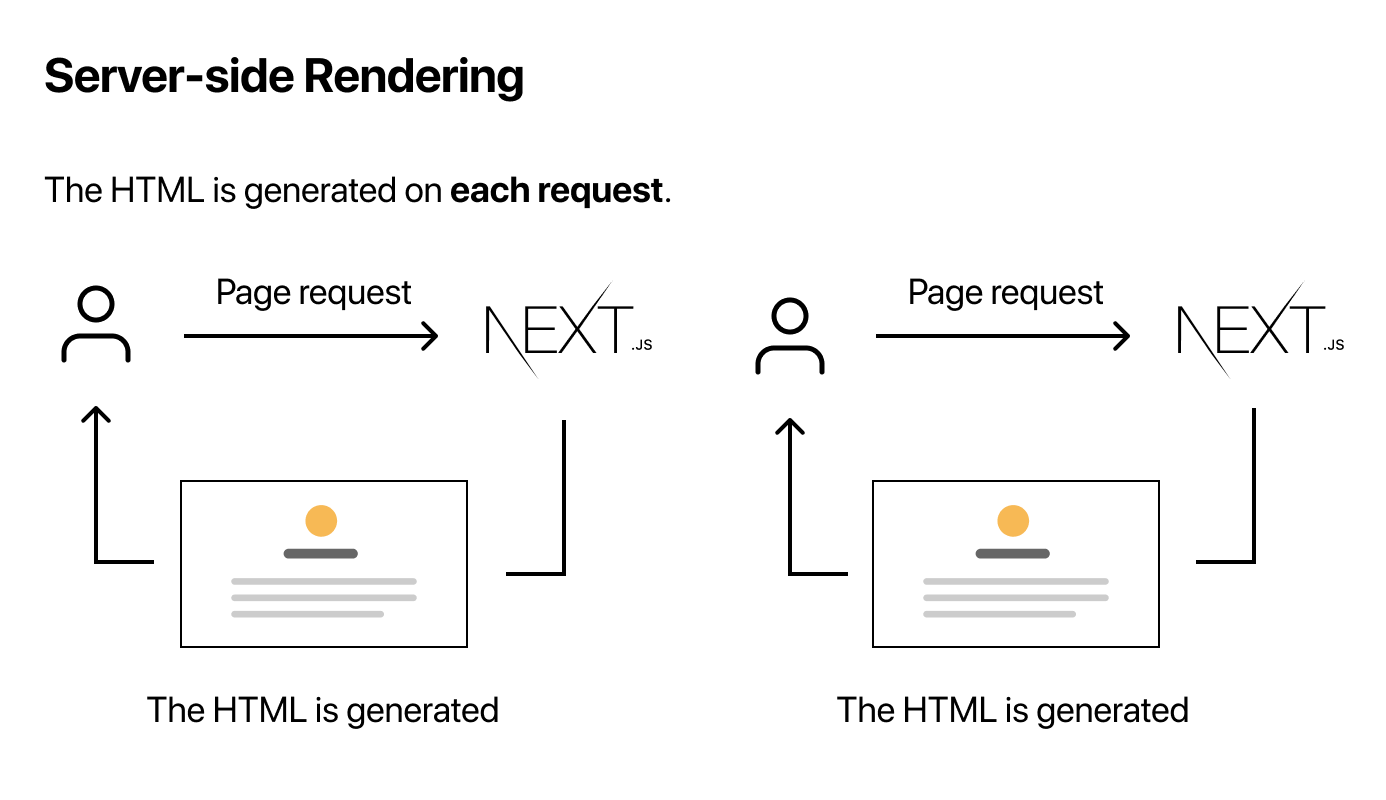
- Server Side Rendering (SSR) is the pre-rendering method that generates the HTML on each request.
In development mode (when we run
npm run devoryarn dev), every page is pre-rendered on each request — even for pages that use Static Generation.
Importantly, NextJS lets us choose which pre-rendering form to use for each page. We can create a "hybrid" NextJS app by using Static Generation for most pages and using Server-side Rendering for others.
Static Site Generation VS Server Side Rendering
When we are looking for SEO, for most pages we can go with Static Site Generation because our page can be built once and served by CDN, which makes it much faster than having a server render the page on every request.
On the other hand, Static Site Generation is not a good idea if we cannot pre-render a page ahead of a user's request. Maybe our page shows frequently updated data, and the page content changes on every request.
Static Site Generation with data using getStaticProps
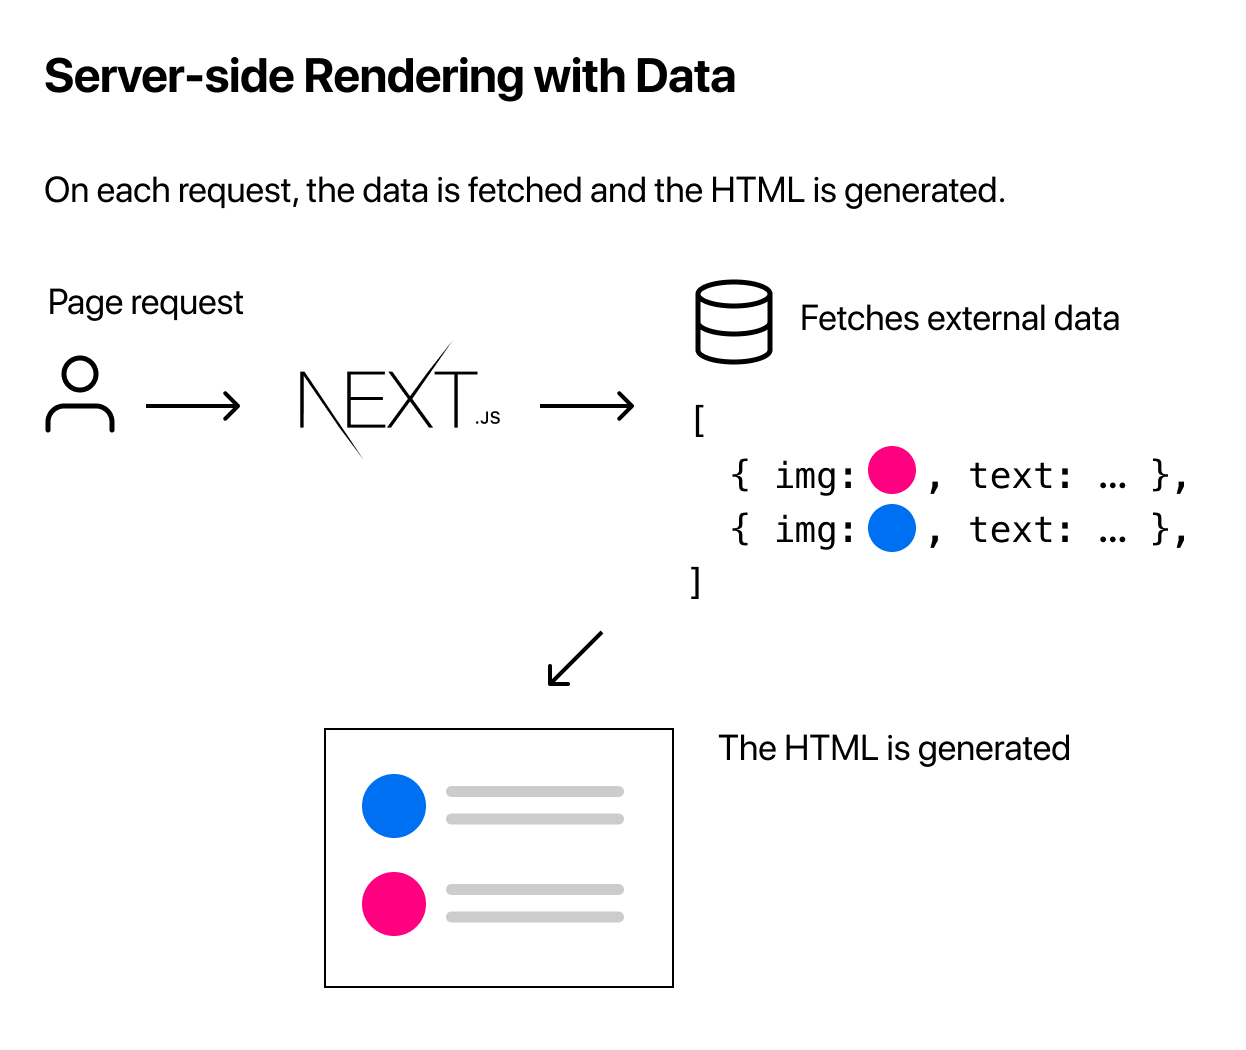
For some pages, we might not be able to render the HTML without first fetching some external data. Maybe we need to access the file system, fetch external API, or query our database at build time. NextJS supports this case — Static Generation with data — out of the box.

When we export a page component, we can also export an async function called getStaticProps. If we do this, then:
getStaticPropsruns at build time in production, and…- Inside the function, we can fetch external data and send it as props to the page.
export default function Home(props) { ... }

export async function getStaticProps() {
  // Get external data from the file system, API, DB, etc.
  const data = ...

  // The value of the `props` key will be
  //  passed to the `Home` component
  return {
    props: ...
  }
}
Essentially, getStaticProps allows us to tell NextJS: “Hey, this page has some data dependencies — so when you pre-render this page at build time, make sure to resolve them first!”
Note: In development mode,
getStaticPropsruns on each request instead.
Some important information about getStaticProps
getStaticPropsonly runs on the server-side. It will never run on the client-side. It won’t even be included in the JS bundle for the browser.getStaticPropscan only be exported from a page. We can’t export it from non-page files.
Server Side Rendering with data using getServerSideProps
Quite similar to getStaticProps
export async function getServerSideProps(context) {
  return {
    props: {
      // props for your component
    }
  }
}
I didn't use it on my first small project so, I won't be going into detail about this topic. You can learn more on NextJS official site.
Client Side Rendering
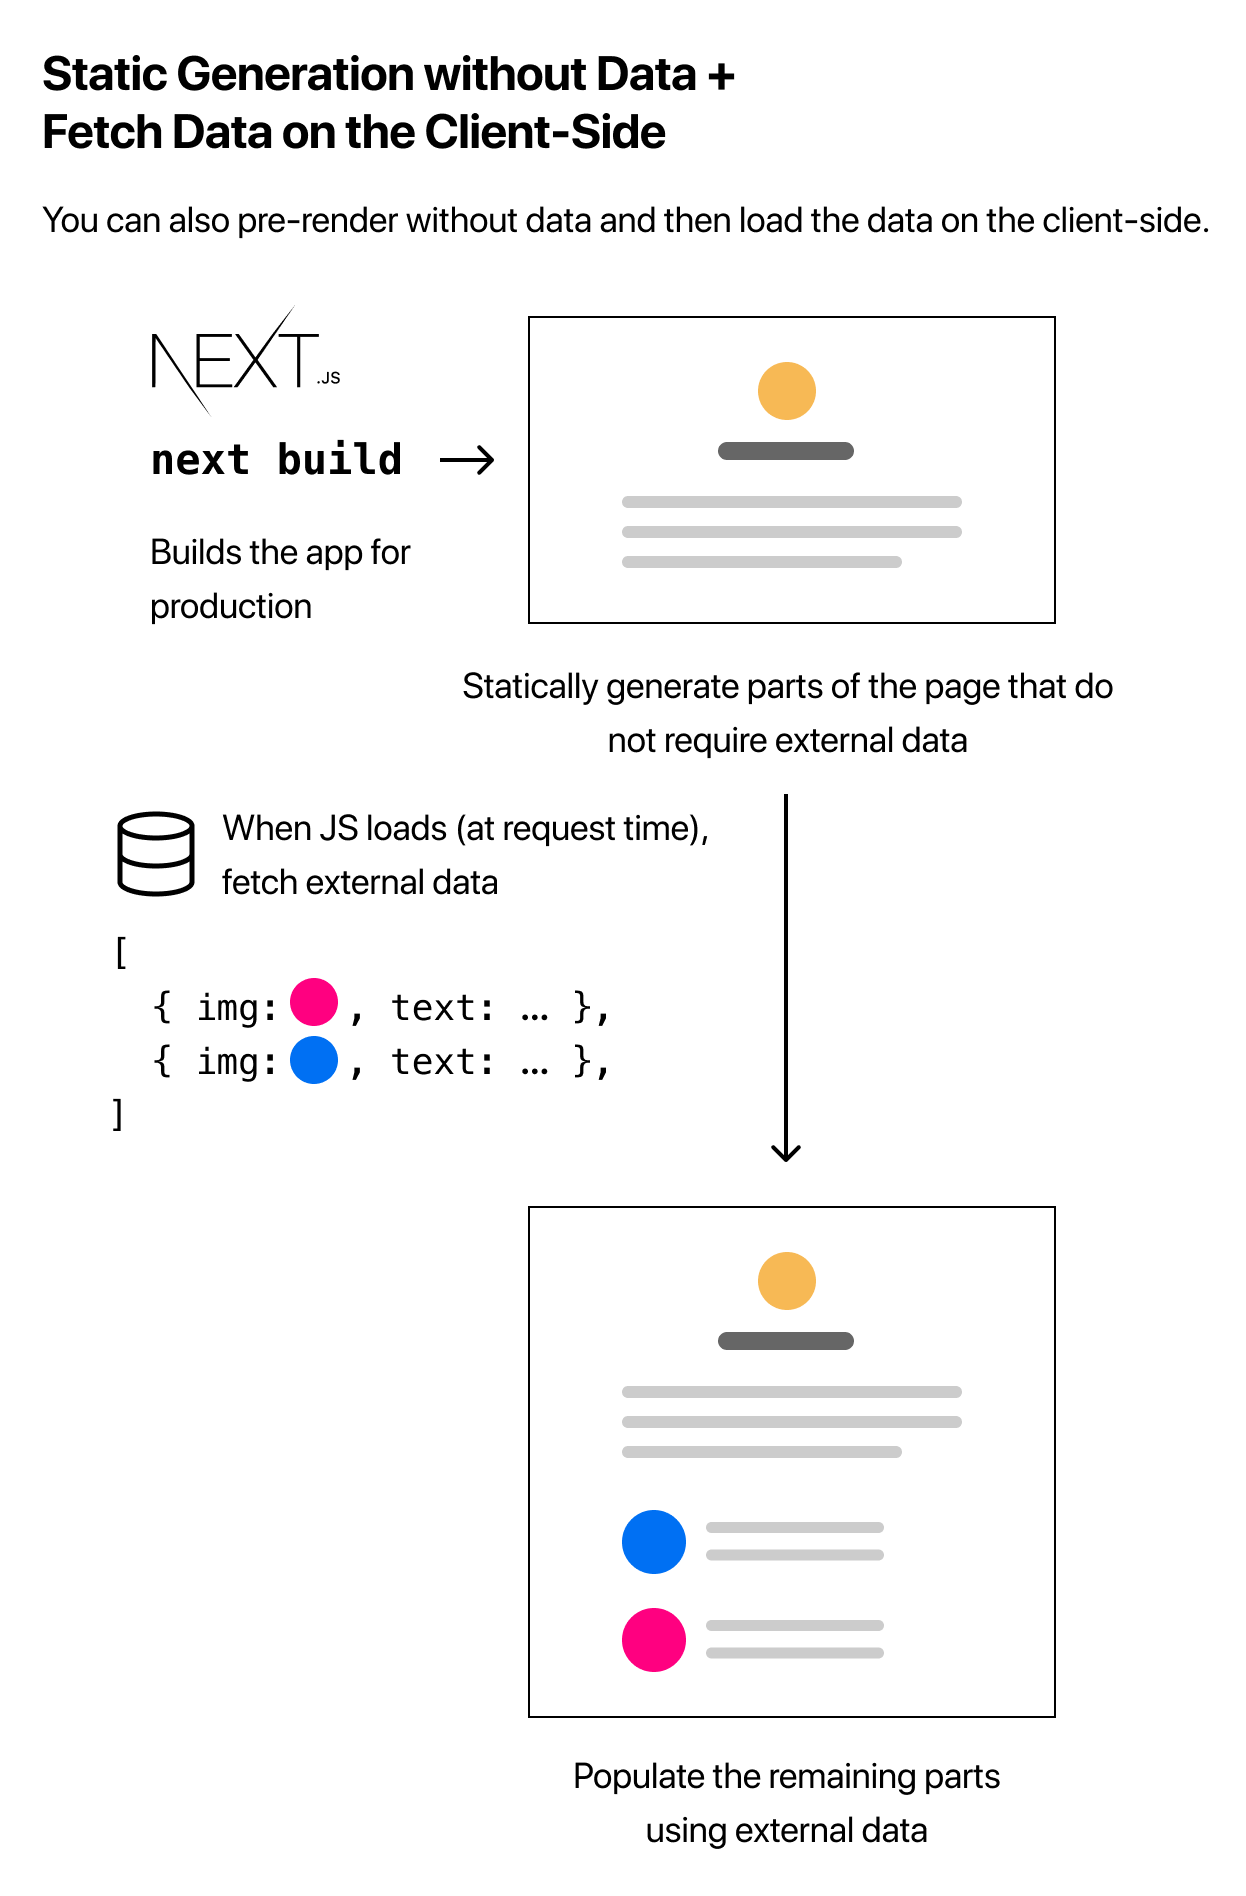
If we do not need to pre-render the data, we can also use the following strategy (called Client-side Rendering):
- Statically generate (pre-render) parts of the page that do not require external data.
- When the page loads, fetch external data from the client using JavaScript and populate the remaining parts.
This approach works well for user dashboard pages, for example. Because a dashboard is a private, user-specific page, SEO is not relevant, and the page doesn’t need to be pre-rendered. The data is frequently updated, which requires request-time data fetching.
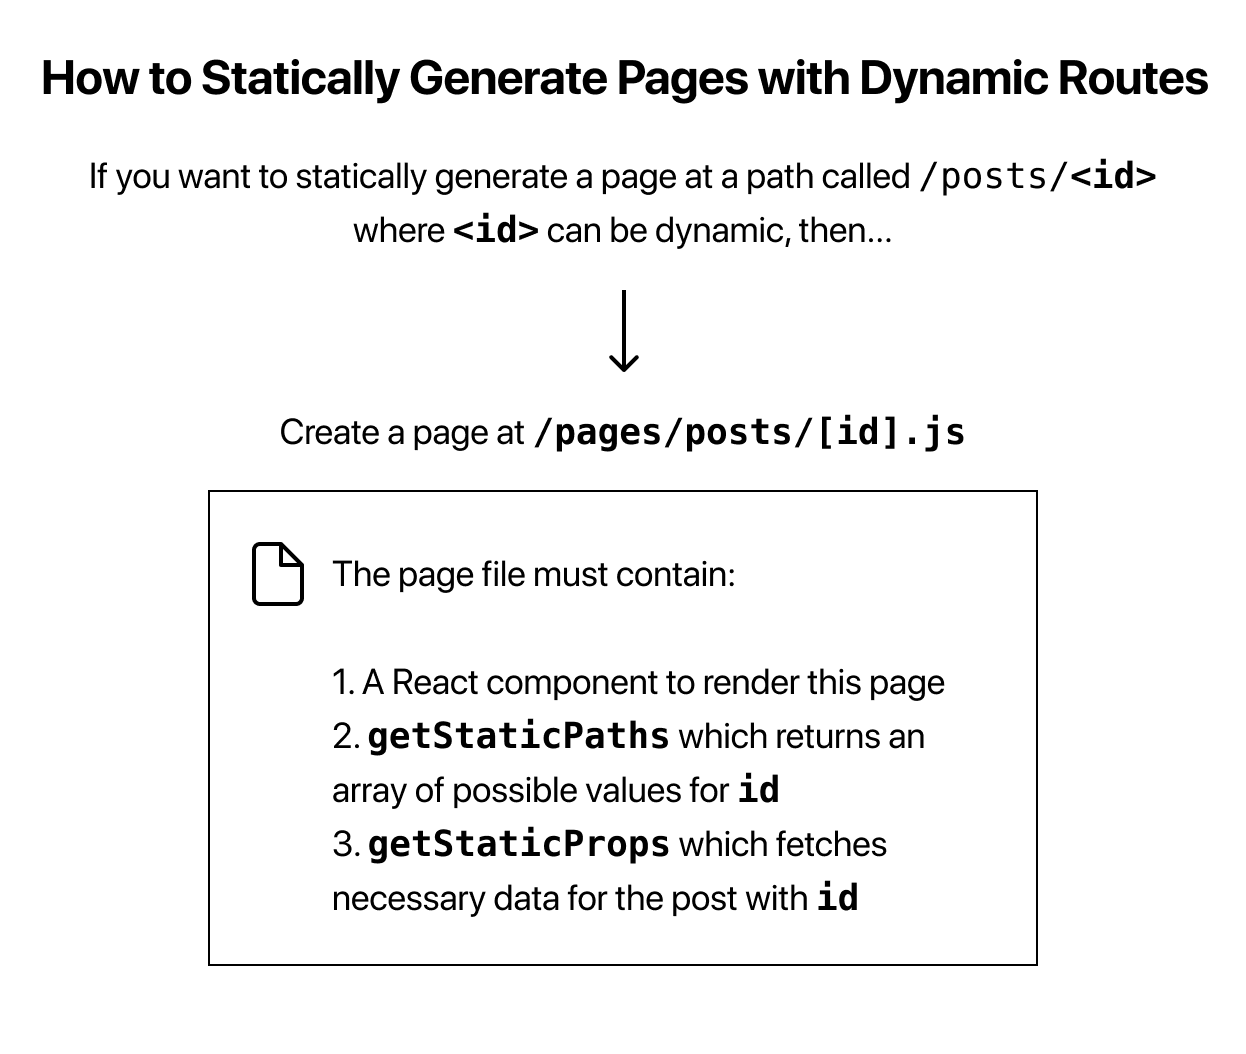
Statically Generate Pages with Dynamic Routes
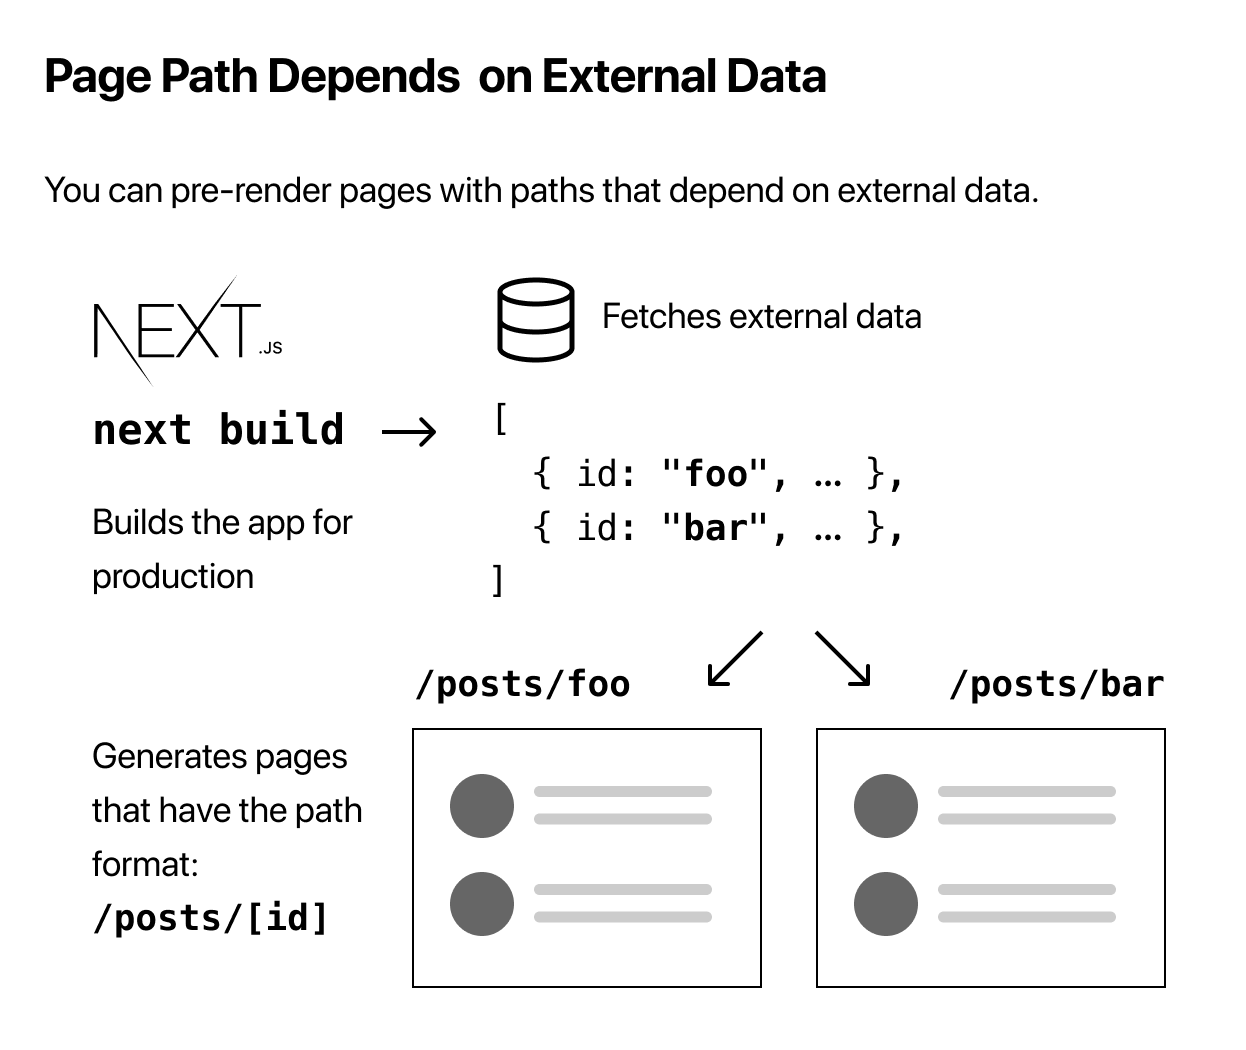
Pages that begin with [ and end with ] are dynamic routes in NextJS. eg: pages/posts/[id].js
Since we are statically generating dynamic routes, we’ll export an async function called getStaticPaths from this page. In this function, we need to return a list of possible values for id.
import Layout from '../../components/layout'

export default function Post() {
  return <Layout>...</Layout>
}

export async function getStaticPaths() {
  // Return a list of possible value for id
}
Finally, we need to implement getStaticProps again - this time, to fetch necessary data for the blog post with a given id. getStaticProps is given params, which contains id (because the file name is [id].js).
import Layout from '../../components/layout'

export default function Post() {
  return <Layout>...</Layout>
}

export async function getStaticPaths() {
  // Should return an object that looks like this:
  // return {
  //   paths: [
  //     {
  //       params: {
  //         id: 'ssg-ssr',
  //       },
  //     },
  //     {
  //       params: {
  //         id: 'pre-rendering',
  //       },
  //     },
  //   ],
  //   fallback: false,
  // }
  // or
  // return { paths: ['ssg-ssr', 'pre-rendering'], fallback: false }
}

export async function getStaticProps({ params }) {
  // Fetch necessary data for the blog post using params.id
}
NOTE:
getStaticPathsis only allowed for dynamic SSG (Static Site Generation) pages.NOTE: In development,
getStaticPathsruns on every request. In production, it runs at build time.
Catch-all Routes
Dynamic routes can be extended to catch all paths by adding three dots (...) inside the brackets. For example: pages/posts/[...id].js matches /posts/a, but also /posts/a/b, /posts/a/b/c and so on.
If we do this, in getStaticPaths, we must return an array as the value of the id key like so:
return [
  {
    params: {
      // Statically Generates /posts/a/b/c
      id: ['a', 'b', 'c']
    }
  }
  //...
]
And params.id will be an array in getStaticProps:
export async function getStaticProps({ params }) {
  // params.id will be like ['a', 'b', 'c']
}
NOTE: Use
getStaticPropsto fetch a specific post given an ID andgetStaticPathsto fetch all possible blog posts.
404 Pages
To create a custom 404 page, create pages/404.js. This file is statically generated at build time.
// pages/404.js
export default function Custom404() {
  return <h1>404 - Page Not Found</h1>
}
API routes
API Routes let us create an API endpoint inside a NextJS app. We can do so by creating a function inside the pages/api directory that has the following format:
Creating a file called hello.js in pages/api with the following code:
export default function handler(req, res) {
  res.status(200).json({ text: 'Hello' })
}
And accessing it at http://localhost:3000/api/hello, will result,
{
  "name": "Hello",
}
Note:
reqis an instance ofhttp.IncomingMessage, plus some pre-built middlewares you can see here.resis an instance ofhttp.ServerResponse, plus some helper functions you can see here.
Important details about API routes
We should not fetch an API Route from getStaticProps or getStaticPaths. The reason is, these functions will run at build time, and they can't fetch an API if they haven't deployed yet. Also, getStaticProps and getStaticPaths runs only on the server-side. It will never be run on the client-side. It won’t even be included in the JS bundle for the browser.
API routes can be good use for handling form inputs and saving to our database.
Deployment
If you are using Netlify to host NextJS app, Edit next.config.js:
// This enables the build plugin to create a standalone serverless function for every page that requires one.
target: "serverless",

// For faster deploy times, build IDs should be set to a static value.
generateBuildId: () => "build",
The deployment process for the NextJS app is same as React app. No difference. Just follow the instructions.
For other hosting provider, run the build script once, which builds the production application in the .next folder.
npm run build
After building, the start script starts a Node.js server that supports hybrid pages, serving both statically generated and server-side rendered pages, and API Routes.
npm run start
Tip: You can customize the
startscript inpackage.jsonto accept aPORTparameter by updating it as:"start": "next start -p $PORT".
Conclusion
These were the basics that I learned while using the NextJS library for the first time. There is still more to explore and learn. I have just scratched the surface. This was the final project that I made while learning the basics of the NextJS library.
It also has an API endpoint. Checkout here.
Thank you for reading my blog/article. ❤️❤️